

XYZ Make

The Life of a Project
Here at XYZ Make, we take your hair brained idea, and turn it in to reality.
Follow along below, how one person's vision is made

01
Idea time
Start by writing out your idea in detail—don’t skip anything, even if it seems minor! Think about the full scope of your project: How will the part be mounted? What thickness does it need? Does it have to fit into a specific space? Jot down every requirement and consideration. The more you capture now, the clearer your direction will be—and it’ll help guide both your thinking and mine as we bring your project to life.
02
Sketch-up
You don’t need to be a master artist to get started—a clear, simple sketch is all it takes. A rough drawing of your idea is the foundation for the CAD work, our discussions, and making sure everyone’s on the same page. Even a basic sketch helps communicate your vision and gives us something concrete to refine together. So grab a pencil and put your ideas on paper—it’s a great first step!


03
CAD Designs
Now the real fun begins—we take your rough sketch and bring it to life in the digital world. Using CAD (Computer-Aided Design), we transform your ideas into precise 2D or 3D models, accurate down to a fraction of a millimeter. This digital stage lets us visualize, refine, and tweak every detail, making sure your design is ready for production. Whether it’s for CNC machining or 3D printing, a solid CAD model is the key to creating perfect files for our machines and ensuring your project turns out just right
04
Review
This is a crucial step in the process. One of the biggest advantages of CAD-driven production is the ability to explore your design from every angle in virtual space—long before any material is cut or printed. We’ll thoroughly review the model together, making sure every detail matches your requirements. This careful check helps us catch any issues early and ensures that what we produce is exactly what you envisioned.


05
Tool Path Development
Now it’s time to get the machines ready to bring your design to life. We program the exact tools, speeds, and sequences the CNC or 3D printer will use, making sure everything runs just as planned. As part of this process, we add features like tabs for CNC machining or supports for 3D printing to keep your part stable during fabrication. These additions prevent unwanted movement or damage, ensuring your project maintains its shape and quality from start to finish. Careful tool path planning means fewer surprises and the best possible results every time.
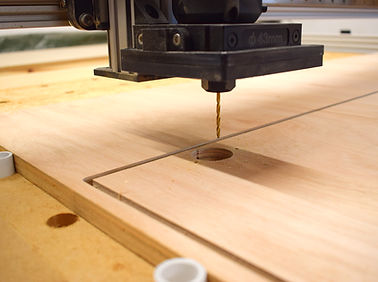
06
Cut!
This is where the magic happens—the machines take over and bring your design to life. Watching a CNC or 3D printer at work is truly mesmerizing. Guided by precise tool paths, the machine’s cutting tool glides smoothly along the X, Y, and Z axes, carving or building your part with incredible accuracy15. Each movement is perfectly coordinated, transforming raw material into your finished piece right before your eyes. Whether it’s the hum of the spindle or the steady rhythm of the tool, seeing these three axes in action never gets old—it’s engineering and artistry working together in real time.

07
Assemble (+ admire!)
Now comes the most satisfying part—bringing everything together. With all the pieces cut or printed, it’s time for assembly. Fitting each part into place, you get to see your idea take its final, tangible form. This is the moment where all the planning, designing, and machine work pays off. Take a step back and admire what you’ve created—there’s nothing quite like the feeling of seeing your vision become reality, ready to use, share, or simply appreciate.